Hello Folks
I was discussing paddle options with one of my clients and he expressed an interest in the Boni Youka style grip that I made on one of my paddles.
I explained that it is very comfortable and I like it but it isn't true to the original design as that has a birds head carved into it and is assymetric in shape.
Later after some thought he emailed me and asked if I could carve a loon onto the grip. I gave it some more thought and replied that it might look better and be more comfortable if it was done as an inlay.
I was also making a canoe for him so had plenty of time for experiment. I decided I would do a test inlay of a loon on my own paddle as I liked the idea and so this project was born.
This would allow me to work out my technique whilst recording how long it would take me to create. That way it would be easy for me to work out a price should he wish to go ahead on the paddles I was to make for him.
Having done a rough sketch of the design on paper I began by cutting up some thin slices of timber from offcuts of exotic timbers I had left from other projects.This one is Wenge.

I made these slices about 1.5mm thick on the bandsaw so I could glue the planed face into the paddle and then sand the cut face smooth once the glue has set. I also had sycamore, walnut and even a bit of rosewood from a table I altered recently.

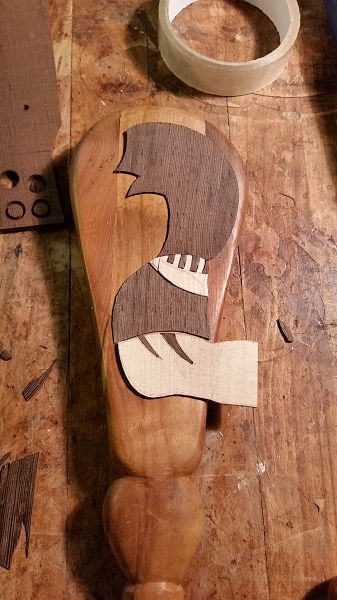
Next I cut out the shapes of the parts of my design starting with this big bit that forms a large part of the birds head and neck.

I carefully cut out this indent with a gouge.

Then I cut out this tiny bit of sycamore to form a stripey area around the neck.
Cutting small parts like this reminds me of making things from balsa wood when I was much younger.

Next I did a few tricky cuts into the Wenge piece so the two fit together.The beauty of this tecnique is that if you break a piece it is all small pieces so it is not too difficult to make another and try again. Luckily It worked first time for me.

I continued working my way down the body so you can see the shape of the bird emerging now.

I then laid it out on the grip so I could see how it would look. I had been making it up as I went along as this is easier than rigidly sticking to your paper design hence the body actually overhangs to the right but it doesn't matter as it will be cut to fit later.

Next I cut and fitted the all important beak or is it bill? I never was sure of the distinction..

With that done I decided it was time to begin carving out the recess it will fit into. I marked and cut around the wood for the first section and then with the paddle firmly clamped to the bench I began to gouge out the recess.

Once the middle of the recess has been gouged out I then work around the edges with gouges and chisels being careful not to go outside the line. Then I put plenty of polyurethane glue in the recess and clamped the first two parts in place. I know it looks like I used a lot of clamps but they are not over tight. The idea is to ensure the wood is down everywhere but you don't want to starve the joint by clamping too hard and squeezing all the glue out!

Once the first bits have set I cut the recess for the next and so on.

Clamping as before

Under this clamp is the eye detail. I drilled it out and fitted a pellet of one timber then drilled it again and fitted a pellet of another timber for the pupil.

Here it is before the pupil is drilled.Looks painful!

Finally once all glue has set the clamps are removed and the whole picture can be sanded and oiled.
What a handsome Bird!

Having done this It has occurred to me that I could inlay any picture of a similar type so if anyone would like a different water bird or a their favourite logo, animal or other design or maybe an initial carved into a paddle grip then please feel free to get in touch.
Happy Paddling!
Alick
